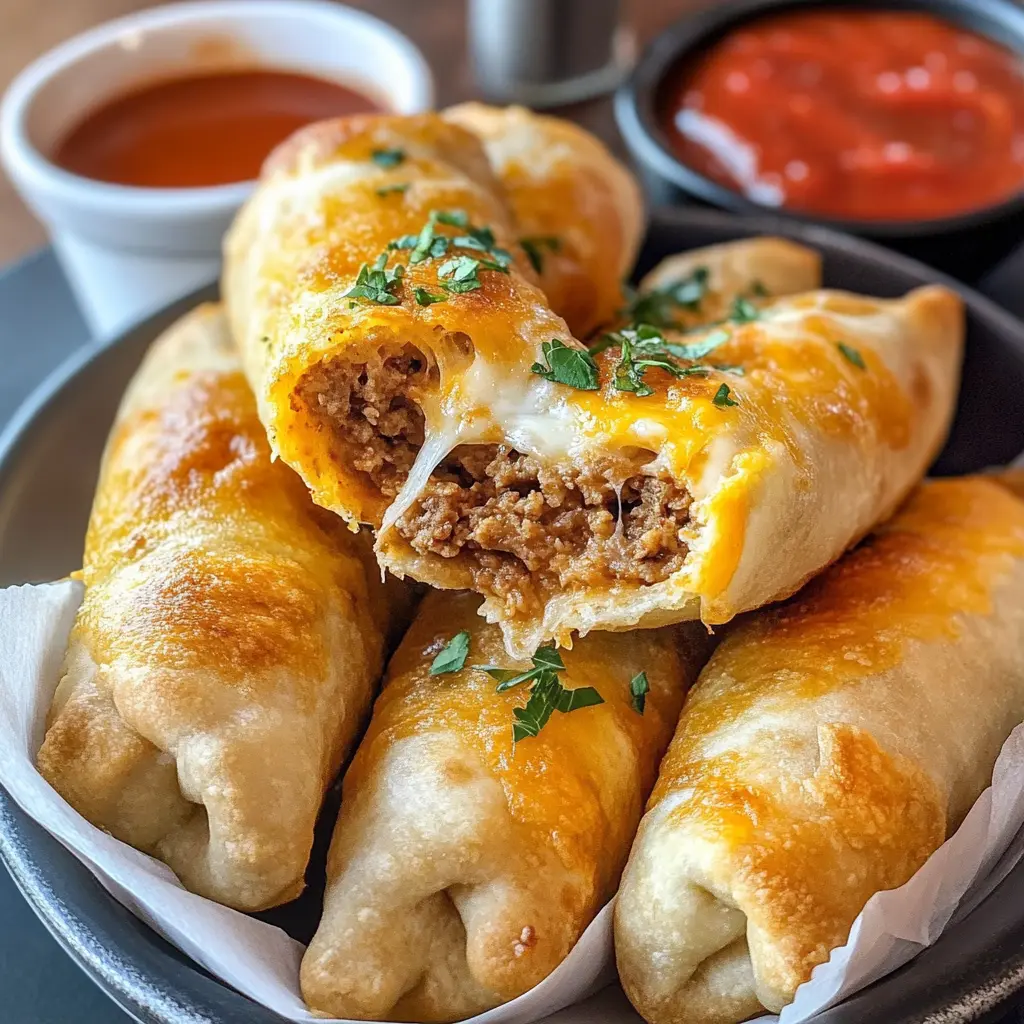
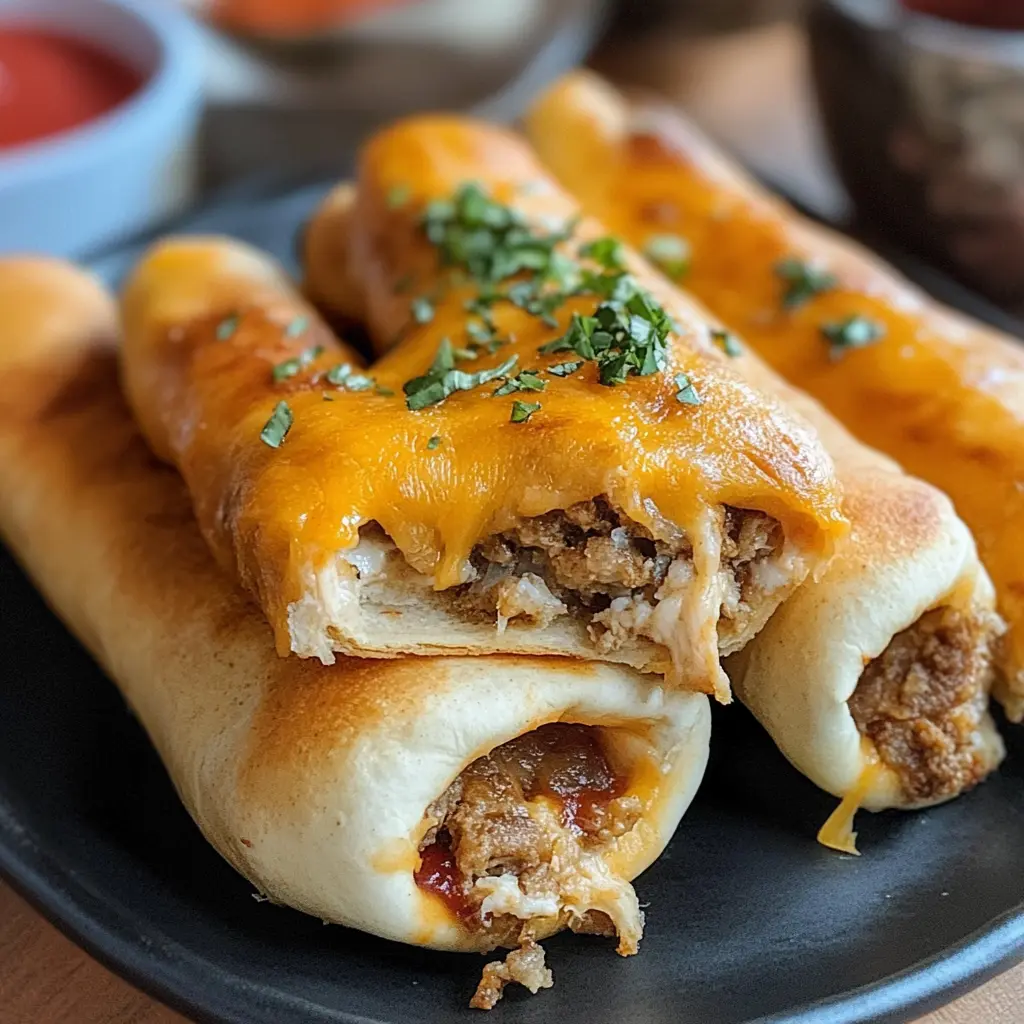
**Input**: Cheesy Taco Sticks
**Output**:
These Cheesy Taco Sticks are a fun twist on your favorite taco! Filled with gooey cheese and tasty taco meat, they’re perfect for any snack time or game night.
Honestly, who can resist cheesy goodness wrapped in crispy dough? I love dipping them in salsa for an extra kick. It’s a tasty combo you won’t want to miss! 🌮🧀
Making these is a breeze! I just whip up the filling, wrap it in dough, and bake until golden. They’re always a hit at my house, especially while watching movies!
Key Ingredients & Substitutions
Ground Beef: I usually go for 80/20 ground beef for the right balance of flavor and texture. If you’re looking for a leaner option, you can use ground turkey or chicken. For plant-based diets, try lentils or black beans as a tasty alternative.
Taco Seasoning: The packet is convenient, but you can make your own blend with chili powder, cumin, garlic powder, and onion powder. This way, you can adjust the spice level to your liking!
Cheese: Cheddar and mozzarella give great flavor and stretch. If you’re short on one, feel free to use more of the other or switch it out for Monterey Jack or Pepper Jack for a spicy kick!
Crescent Roll Dough: While crescent rolls add a nice buttery flavor, you can also use pizza dough or puff pastry if that’s what you have on hand. Have a gluten-free diet? Look for gluten-free dough options!
Oil for Frying: Deep-frying gives a crispy texture, but you can bake for a healthier version. If you want to fry, use vegetable or canola oil for a neutral flavor.
How Can I Get the Dough to Seal Properly?
Sealing the dough is important to keep the filling inside. Here’s how to do it right:
- After placing the filling in the center, make sure to pinch the edges firmly, ensuring there are no gaps where filling can escape.
- A little water on your fingertips can help seal the edges better. If using crescent roll dough, pressing the seams together is key.
- Don’t overcrowd the baking sheet or frying pan; give each stick space to puff up and get crispy.
Taking these steps will help ensure your cheesy taco sticks turn out perfectly every time!
How to Make Cheesy Taco Sticks
Ingredients You’ll Need:
For the Filling:
- 1 lb ground beef
- 1 packet taco seasoning
- 1 cup shredded cheddar cheese
- 1 cup shredded mozzarella cheese
- 1/2 cup salsa
For the Dough:
- 1 can refrigerated crescent roll dough (or pizza dough)
- 1 egg (for egg wash)
For Cooking:
- Oil for frying (optional)
- Cooking spray (if baking)
Optional Garnishes:
- Sour cream
- Extra salsa
- Chopped cilantro
How Much Time Will You Need?
This recipe takes about 30 minutes to prepare and cook. You’ll spend time cooking the beef, assembling the sticks, and either baking or frying them. Get ready for some delicious cheesy goodness!
Step-by-Step Instructions:
1. Preheat Your Oven or Oil:
If you’re planning to bake the taco sticks, start by preheating your oven to 375°F (190°C). If you’d prefer to fry them, heat some oil in a deep pan or skillet over medium heat until it’s nice and hot.
2. Cook the Beef:
In a medium skillet, cook the ground beef over medium heat. Keep stirring until the beef is browned and fully cooked. After it’s cooked, drain any excess fat. Add the taco seasoning and a splash of water, then stir everything together. Let it simmer for about 5 minutes to blend the flavors.
3. Prepare the Dough:
Next, unroll your crescent roll or pizza dough on a clean surface. If you’re using crescent rolls, press the seams together to make one solid sheet. Cut the dough into rectangles, about 3×5 inches each. These will be your taco sticks!
4. Add Filling:
Take about 2-3 tablespoons of the seasoned beef mixture, and place it right in the center of each rectangle. Then, sprinkle a mix of shredded cheddar and mozzarella cheese on top of the beef. Yum!
5. Fold and Seal:
Now it’s time to fold! Bring the edges of each rectangle over the filling to form a stick shape. Pinch the edges together tightly so the filling won’t spill out while cooking.
6. Egg Wash:
To make your taco sticks look golden and delicious, beat an egg in a small bowl. Use a brush to coat the tops of each stick with the egg wash. This will give them a nice golden color when they’re done cooking.
7. Bake or Fry:
Now, choose your cooking method:
- **For Baking**: Place the sticks on a greased baking sheet. Lightly spray the tops with cooking spray. Bake in your preheated oven for about 15-20 minutes, or until they’re golden brown.
- **For Frying**: Carefully slide the sticks into the hot oil, frying them in batches. Let them cook until they are golden brown and crispy on all sides. After frying, remove them and place them on paper towels to drain excess oil.
8. Serve:
Once your cheesy taco sticks are ready, serve them warm! Pair them with salsa and sour cream on the side for dipping. Feel free to sprinkle some chopped cilantro on top for extra flavor!
Enjoy your cheesy, flavorful taco sticks! They’re perfect for a snack or a fun meal!
Can I Use Ground Turkey Instead of Ground Beef?
Absolutely! Ground turkey is a great leaner alternative to ground beef. Just ensure to cook it until it’s no longer pink, and adjust seasoning as turkey can be milder in flavor. You might want to add a bit of extra taco seasoning for a bolder taste!
How Can I Make This Recipe Vegetarian?
To make cheesy taco sticks vegetarian, simply substitute the ground beef with a mix of black beans and corn or your favorite plant-based meat alternative. Just season well with taco seasoning to ensure it’s packed with flavor!
What’s the Best Way to Store Leftovers?
Store any leftover taco sticks in an airtight container in the fridge for up to 3 days. To reheat, pop them in the oven for about 10 minutes at 375°F (190°C) for that crispy texture, or microwave them for a quicker option. Just be mindful that microwaving may soften the dough.
Can I Freeze These Taco Sticks?
Yes, definitely! You can freeze the uncooked (assembled but unbaked) sticks in a single layer on a baking sheet, then transfer them to a freezer bag once solid. They’ll keep for about 2-3 months. When ready to enjoy, bake them straight from the freezer—just add a few extra minutes to the baking time!